
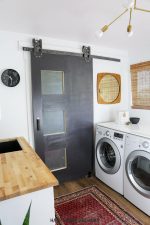
Welcome back to another week of makeover madness and the One Room Challenge. The challenge started out great….I was organized and excited and so optimistic. The flooring was a breeze to install…the barn door wasn’t bad. Then it came time for the counter tops….
I think that there are two different camps when it comes to DIY…
Those who want to do it all themselves….
…and those who don’t want any part of DIY
I’m sort of in the middle…
Over the past few years of fixing up our fixer upper we have learned a lot. When we first bought the house we had NO CLUE what we were doing. We decided it would be wise to get some help. We hired the worst contractors and ended up learning, by default, how to do a lot of the repairs ourselves.
One very valuable lesson that I learned through that whole process, is that I can still DIY something if I get specific help on areas that are out of my expertise. Finding the right people to help, can be very valuable in a DIY project.

This post is in collaboration with BLANCO. My opinion of beautiful sinks and faucets in my own. See my disclosure for more info.
SERIES LINKS:
week 1- before pictures and inspiration board.
week 2- everything you need to know about LVT flooring
week 3- How to Decide: DIY barn door hardware or purchase hardware
week 4- How to install an undermount sink (you are here)
week 5- Black and blush geometric accent wall
week 6- Reveal
Laundry room Source list—-all the sources.
For the counter top sink, we ended up going with an IKEA butcher block. It’s solid wood and around $100 so it just seemed like a pretty affordable lovely option.
I cut the butcher block down to size with the skill saw.
When it came time to mount the sink and cut the hole for the sink my eyes sort of got bug eyed….I just wasn’t sure if I was willing to practice cutting an undermount sink on my brand new IKEA butcher block.
I called around to about 2-3 counter top places in town and found one that would cut it for me for about $25….what a time saver and such a huge relief to have that taken care of….for $25
Once I got the counter top back it was time to install the sink.
I read over the directions and watched a couple videos on how to install an undermount sink…before too long I was ready to go. Here is, how to install an undermount sink.
HOW TO INSTALL AN UNDERMOUNT SINK:
Use 100% silicone to caulk on the bottom of the butcher block, where the sink rim touches the counter…preferably clear, white was all I had.

Place the sink over the opening, on top, of the silicone.
This step really would have been a lot easier with two people but I managed ok.
You can sort of move the sink around a little bit until you have it perfectly centered. Again, two people is better than one here.
The sink should come with hardware for mounting.

Use a drill and drill a small hole just big enough to put in the little metal threaded piece. Insert the bolt, washer, and wing nut to tighten the bracket. This is very strong CAUTION….do not over tighten. If you over tighten then the small metal threaded piece will come out…I learned my lesson.
Here is what they look like all installed. 
The laundry room has a modern moody vibe with the black door and I really, REALLY, wanted a black sink….BLANCO really came through for me. They have the best sinks and faucets.
I ended up going with the BLANCO Diamond Single Bowl. They have a TON of option to choose from.
For the faucet….again I wanted black. I went with the BLACNO Linus- Pullout Silgranit. It has the same finish as the sink and just as beautiful.
What I love about BLANCO is that they have a ton of different colors, sizes and options to fit any space. You can check out their sink selector page. Add in your specifics and it will bring up all the options for that specific search.
Doing it yourself is about figuring out the best way to get something done right, and save money…sometimes you need to find other people to help you do that. If I would have gone to a countertop place…..they would have charged me more than double to manufacture the butcher block, cut it to size, cut the hole for the sink, and mounting the sink… I only got help on one portion of this project. It really paid off.
Next week I will be sharing the super cool accent wall in this space…I am so excited!


A BIG OL’ THANK YOU TO OUR FABULOUS ORC SPONSORS!
Behr Paint
Metroflor
Artisan Hardware
Blanco

SERIES LINKS:
week 1- before pictures and inspiration board.
week 2- everything you need to know about LVT flooring
week 3- How to Decide: DIY barn door hardware or purchase hardware
week 4- How to install an undermount sink (you are here)
week 5- Black and blush geometric accent wall
week 6- Reveal
Head over and check out how all the other participants are doing.


Hey, I don’t think all your text made it into this blog post. For me, it ends on “You can sort of move the sink around a little bit until you have it perfectly centered. Our” and then several pictures and links and that’s all.
Fixed now. 🙂
The sink looks awesome! love it 🙂
Stand with your legs hip-distance apart. Breath in deeply and raise your arms to the ceiling. Roll your shoulders back and tuck your tailbone towards the floor.
Raise both of your arms to the ceiling while you take another breath in. Try to reach the ceiling with as much of your body as you can.
As a busy mom, finding time to cook can be a challenge, which is why I’m so grateful for The Flower Shop NYC’s delivery service. It’s been a lifesaver on more than one occasion! Their ordering process is quick and easy, perfect for those hectic days when every minute counts. And when the food arrives, it’s like a breath of fresh air. Each dish is thoughtfully prepared and bursting with flavor. I love that they offer a wide range of options to suit every palate, from hearty comfort food to lighter, healthier fare. Plus, their delivery staff is always friendly and professional, adding an extra layer of warmth to the experience. Whether it’s a family dinner or a cozy date night at home, The Flower Shop NYC’s delivery service never disappoints. I’m a loyal customer for life! Their Official site.
This guide is fantastic. The clear explanation about using 100% silicone for caulking, along with the cautionary note on overtightening the hardware, are valuable tips that anyone installing an undermount sink should know.